By Caroline Cook
Winter is on its way.
And with the sun checking out early and the end-of-the-year stress creeping in, you may find yourself in need of place to escape. Here are two DIY’s that will bring warmth to your space and put you in a cozy state of mind.
Mason Jar Lanterns
What you need:
Glass Jars (I used both Mason and a sauce jar)
Painter or masking tape
String
Spray paint
Candle or battery-operated tea lights
What you do:
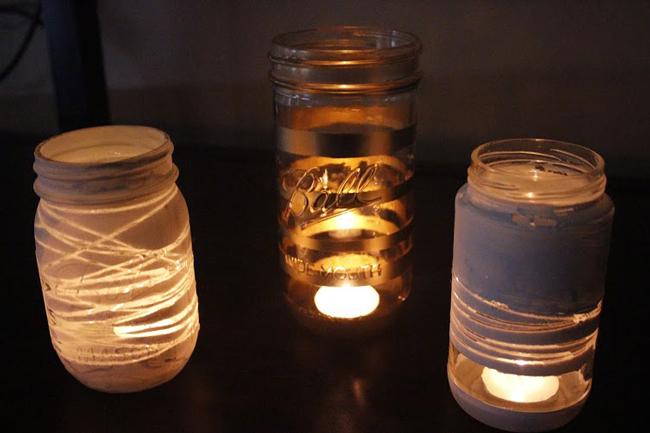
1. Come up with a design. Wrap the string or tape around the jar in the pattern of your choice. Make sure the string is really tight to prevent the paint from dripping underneath and ruining the lines you create. If you find yourself unsure of how much to cover up, remember that you can always go back and paint more. Keep in mind that you want to cover up enough so that the light will shine through.
Because you are working with negative space, this can be slightly tricky. Everything you cover up will remain transparent, so you have to imagine everything in opposites.
2. Spray paint the jar. Aim the can approximately 12 inches away, spraying evenly and rotating the jar as you go. Spray in thin coats to avoid dripping.
3. Let it dry. This should take about 30 minutes to an hour depending on the outside temperature.
4. Carefully peel off the string or tape to reveal your design. Drop in your tea light of choice and watch it glow!
Mini Flameless Campfire
What you need:
Sticks about three to four inches in diameter
Stones/rocks in varying sizes
Lace ribbon or strips
Aluminum foil
Fabric stiffener or glue (I used Mod Podge but I think the stiffener would’ve been
better)
Paintbrush
Clear/white LED Christmas lights
What you do:
1. Go outside! Take this as an opportunity to get in touch with nature (even if it’s just for ten minutes). Find a trail or a slightly wooded area and collect five or six branches. Make sure they aren’t too thin. Otherwise, you may have a hard time in the later steps. Then, collect as many rocks as you’d like (hey, they’re free!) I went for about four to five medium to large-sized stones with a few smaller ones for variety.
2. Once you’re back inside, wrap your sticks in aluminum foil. Make sure you cover every inch of wood so that the lace doesn’t stick once it dries. I also suggest removing any extra limb from the branches, as the aluminum foil may be hard to remove once the glue dries.
3. Now, it’s time to wrap the branches with lace. Take your paintbrush and apply the fabric stiffener or glue to a lace strip, completing coating it. The more you use, the sturdier the lace will be once it dries. Wrap the lace around your branch from one end to the other, making sure there are no holes. Repeat until you’ve covered all of your branches. Let this dry completely. I waited overnight.
4. Once dry, take a sharp knife and cut one clean line down the lace, cutting through the aluminum foil. Remove the lace cast from the branch. Next, carefully peel the aluminum foil from the inside of the lace. Try not to take off any glue as you do this because it might ruin the stiffness of the cast. Repeat on all branches.
5. Time to build the fire! Rinse your stones before arranging them in a circular shape. Place the Christmas lights in the center after making sure an outlet is within reach. Arrange your lace branches however you please. If you have a hard time getting them to stand up, don’t worry! You can arrange the rocks and the lights to support them.
6. Now, plug in your lights, make some tea and cozy up to your fabulous indoor campfire… or should we say ‘glampfire?’ While it may not emit heat in the literal sense, your personal fire pit will bring warmth to any cold day.
















Valerie Little • Nov 11, 2014 at 12:16 am
Very cool ideas. Great article.